Hi, I'm Rachel.

A few years ago I could barely boil water.

True story.

Determined to be a kick ass wife, I developed a love for football and learned to cook in my tiny Jersey City kitchen. I spend my days working in Manhattan, my nights and weekends chasing after a rambunctious toddler, and the hours in between cooking with my husband and feeding my TV habit...oh, and I blog about it all! 

Welcome to my world!

Search for Recipes & More!

Subscribe via Email:

Delivered by FeedBurner

Still Hungry?
my foodgawker gallery
Search for Recipes & More!


Subscribe to TAA by Email!

Delivered by FeedBurner


Follow the Food

The Pantry

Entries in Recipes (92)

Wednesday
Jun302010

Create an Herb Garden, Just About Anywhere

Who says you need a lush backyard with sprawling greens to grow your very own herbs? Ever since we moved into our brand spankin' new digs here in Jersey City, we've been harboring a pretty open obsession with the terrace. We filled it with a grill, some plants, flowers and a sweet little herb garden. I might be using the term garden a little...liberally. All it took was a $6 long plastic flower box, some potting soil and some starter herbs from Home Depot. While I was in Brooklyn celebrating Kim's birthday girls-night style, Shaun was home putting our little garden-that-could all together. It started out looking something like this:

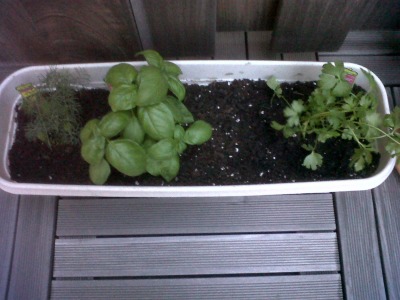
And within a few short weeks, we had a lush green herb garden of our own, complete with bright herbs that not only look gorgeous but smelled delightful to boot. From left to right, Dill, Basil, Sweet Peas, Parsley.

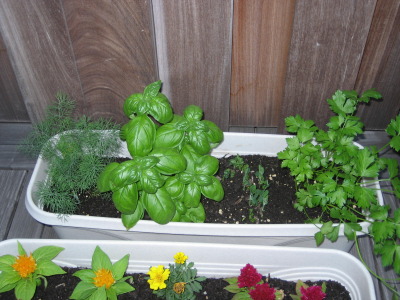
Anxious to get cookin' with our new herbs, Shaun concocted a fun twist on the classic caprese salad. Using our freshly grown basil, Shaun and our new best friend, Mr. Weber, fixed a warm caprese salad that has become a nightly staple in recent weeks.

Grilled Caprese Salad
large heirloom tomatoes
fresh mozzerella
fresh basil
olive oil
kosher salt
fresh ground pepper

Heat up your grill, be it charcoal, gas or Foreman. Slice the tomato into thick slices. Chiffonade the basil, place atop the sliced tomato and top with a thick slice of fresh mozzerella. Drizzle a bit of olive oil, kosher salt and pepper and grill for a few minutes until the cheese is melted and the tomato has a bit of char on the edges. Enjoy!

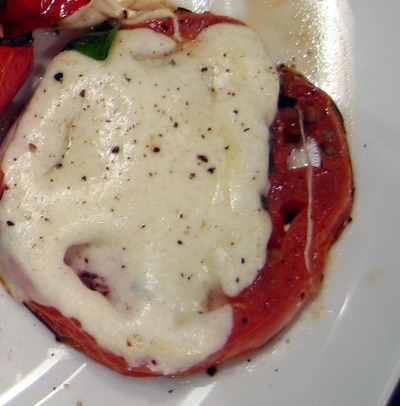
And now we're in the midst of concocting lots of recipes to utilize our fresh herbs. Once they get growing, they tend to spring up pretty fast. The only way to keep 'em alive? Use them up in delicious dishes.

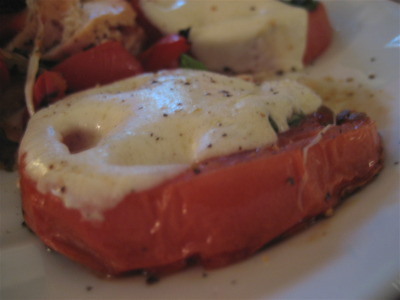
So there you have it - how you can make a mini herb garden just about anywhere, even on a tiny terrace outside your urban dwelling. We're just about thrilled that we no longer have to splurge $3 for a bundle of dill just so we can use a quarter of it for dill and yogurt dip, while the rest goes bad before being put to good use. And my Shrimp Sautee with Orzo will surely benefit from some fresh sprinkled parsley, rather than a few dried sprigs. But what about you? Are you of the grow-it-yourself mindset?

Wednesday
Jun232010

Father's Day Filet

This past Sunday I celebrated Father's Day by sunning, pooling and spending time with my dad and family. The hot and steamy weather was enough to keep us outdoors, by the pool and on the grill. No stuffy restaurants, no fancy outfits. But hanging by the pool and relaxing like it's nobody's business was no reason to skimp on a delicious meal. The dinner worthy of celebrating the dad of all dads? Grilled filet mignon and a plethora of mouthwatering sides including roasted cauliflower, corn on the cob and sauteed peppers, onions and mushrooms. There's really nothing like a summery dinner of fresh ingredients and this one was chock full of 'em.

While my mom did most of the cooking and I handled dessert (specifically my roasted pears with sweet ricotta cream), I pitched in with preparing the filets for their D-Day, if you will. While the term filet mignon might sound intimidating (I thought it did, anyway), it truly couldn't be easier. Let's take a look, shall we?

Grilled Filet Mignon
Filet Mignon, about 6-8oz per person
Bacon strips, about 2 slices per individual cut (we used the turkey variety)

Turn on your grill. Unwrap filets and place on large plate or tray. Wrap the perimeter of each piece of meat with bacon and secure with toothpicks (I put one in each of the four sides). Each cut took 2 slices to cover. Don't they look good enough to grill? Place on warm grill and resist the urge to flip, nudge, turn, rotate or move the meat in any way. Let sit for about 5 minutes. Flip the meat over and cook about another 5 minutes, again resisting the urge to move the meat. The cooking time is of course contingent on how 'done' you like your meat. It could take more or less depending on your taste, so my recommendation is to keep your eye on it. Once at desired doneness, remove from heat and cover with foil so the meat can rest (If you dig right in, the juices will run everywhere, making the meat significantly less delicious) for about 10 minutes. Remove toothpicks and enjoy!

So there you have it - a pretty wonderful Sunday dinner, worthy of one said fantastic father. And just for a little fun, check out a shot of Dad walking me down the aisle at my beach wedding in Aruba...

So how did you spend your Father's Day? And what did you eat?

Sunday
Jun132010

Birthday Cake

Last week was my sister Kimberly's birthday and we marked the occasion with a soiree at her Brooklyn apartment. Since I'm all about testing my culinary skills, I offered to make the dessert and opened the door to what Kim might think up. Luckily, she's a girl after my own heart and likes things simple (in other words, no Irish Car Bomb cuppy cakes or Mint Julep Brownies, please and thank you). While I'm typically of the chocolate cake-vanilla buttercream persuasion, Kimberly requested a basic yellow cake with chocolate frosting. Sounds easy enough, right?

Since my wonderful mother is something of a domestic goddess (and a super chef to boot) I consulted her for a recipe recommendation. The suggestion? Old-school Betty Crocker as "the only one I would trust," (that's a direct quote). When I saw the recipe for Betty Crocker's New Starlight Cake, I literally said the words, "Could this BE any easier?" And oh how I spoke to soon. 

I'm not sure if it was my new oven, the recipe, or some lackluster baking skills, but my first cake turned out like this when I tried to get it out of the pan. Burnt and broken. Not exactly the moist and fluffy confection that I envisioned. If it wasn't quite so bad, I would have tried the whole glue-the-cake-back-together-with-icing-no-one-will-notice-the-chocolate-river-down-the-middle trick. But alas, the cake was literally in two pieces and I just couldn't bring myself to try and salvage it. So on the morning of the party, I gave it another go. This time, I shortened the baking time considerably, greased that pan like it was nobody's business, and voila...a scrumptious yellow cake worthy of a certain someone's 24th birthday. It was a bit drier that I had hoped, but once slathered with super chocolatey frosting, this cake turned into one that I would definitely make again. Let's get down to the details...

New Starlight Cake
*Adapted from Betty Crocker
2 C all purpose flour
1 1/2 C sugar
3 1/2 tsp baking powder
1 tsp salt
1/2 C vegetable shortening (like Crisco)
1 C milk
1 tsp vanilla extract
3 eggs

Preheat oven to 350 degrees. Butter and flour one 13x9" pan or two round layer pans (Note: You really need to get on this like never before. I had a lot of trouble getting my cake out of my pan and I was using a new non-stick pan loaded with de-sticking ingredients. Just when you think you've buttered and floured enough...do it some more). Measure all ingredients into a mixing bowl (I used my stand mixer, but I will assume that a hand mixer will work just as well). Blend 1/2 minute on low speed, scraping the bowl as it goes. Beat 3 minutes on high speed, still scraping bowl as necessary. Pour the mixture into your pan (or pans).

Now here's the tricky part. The recipe says bake 40-45 minutes for a 13x9" pan, and 30 to 35 for round layer pans. When I baked my 13x9" cake for the first time, I let it go for 40 minutes and ended up with the aforementioned debacle. On the second try, I went with 30 minutes. At this mark, the toothpick came out clean, so I went with it. In my not-so-expert opinion, I'd say regardless of which size cake you make, do a thorough check at 30 minutes (or earlier for the round pans). Just sayin'. Once finished, cool completely and ice with chocolate frosting.

"Perfectly Chocolate" Chocolate Frosting
*Adapted from Hershey's Unsweetened Cocoa can back
1 stick unsalted butter
2/3 C unsweetened cocoa (obviously I went with Hershey's)
3 C confectioners' sugar
1/3 C milk
1 tsp vanilla extract

Melt the butter. Add to a stand mixer (or a mixing bowl with a hand mixer) and stir in the cocoa. With the mixer on medium speed, alternately add the confectioners' sugar and milk. Beat until smooth, scraping the bottom and sides of the bowl to ensure it mixes evenly. If it's too thick, add a bit more milk. Stir in the vanilla extract.

So there you have it. One basic, yet mouthwatering birthday cake. Oh, and you'll notice the Happy Birthday Kim and ribbon trim, courtesy of yours truly and my sister Christine. Not bad for a can of pink frosting with a ribbon tip, huh? Anyhow, what kind of birthday cake is your favorite?