

Skillet Chicken Parmesean
Since Shaun and I have had such a busy summer, I quietly cherish the nights when I come home to my new condo after work without any other commitments. You may have noticed that due to my extreme lack of recipe posting that I haven’t been cooking all that much recently. Since we’ve adopted an outdoor space in our new home, that meant immediately purchasing a grill and that Shaun has been responsible for most of our dinners since June. Grilling is just not something that I’ve tackled as of yet.

Anyhow, last night I found myself on the very rare occasion where I had the place all to myself for a few hours after work while Shaun was at a work dinner. While I’m typically content with a glass of wine and a plate of cheese and crackers, the frozen chicken in the bottom of my freezer was just calling my name this morning when I left the house. Defrosted and ready to be cooked by the time I got home, I had no grand plan for the pound of organic chicken that greeted me on arrival.
Instead, I rummaged through my cabinets for anything that would be semi-appropriate for dinner fare. With two giant sleeves of shredded mozzerella in my freezer and tomato sauce in the cupboard, I decided to try chicken parmesean. But not any chicken parmesean that I’ve ever had. Oh no. For a one person dinner, the thought of breading, frying and subsequently baking a real dish of chicken parm was out of the question. After all, I have much better things to do...like writing this little ol’ blog, catching Jersey Shore, and enjoying my terrace with a glass of Malbec. So with all of these fun things in mind, I realized that the only way to do a chicken parm for one would be to make it all on the stovetop. Without breading the chicken.
I’m completely putting aside all of my Italian heritage and my mother’s inevitable judgement by going for the gold and trying this dish. In fact, I secretly wish that just maybe she won’t read this post. Because not only did I make chicken parm in a skillet, but I used tomato sauce from a can. Not even a jar. Without even going so far as to doctor it up in a saucepan with herbs and bay leaves, which would still be blasphemy but at least semi-respectable. And let’s not even touch on the fact that since I have my groceries delievered now, I was unable to stop the grocer from replacing the highly coveted Red Pack brand of tomato sauce with lowly Del Monte. I was just doing all kinds of wrong.
But the outcome? It was nothing short of a perfect dinner for one. Flavorful and even semi-healthy. I was so excited by the outcome that I had to share with you at the first possible moment. So here you go...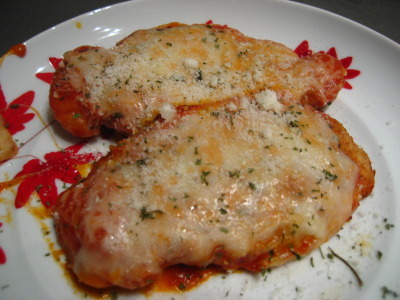
Skillet Chicken Parmesean
1 lb chicken breast (I use organic, skinless, boneless)
3 tbsp whole wheat flour
8 oz tomato sauce (I would typically recommend Red Pack, but whatever you have on hand is fine)
shredded part skim mozzarella cheese
kosher salt
olive oil
dried basil leaves
dried parsley
Parmesean or pecorino, grated
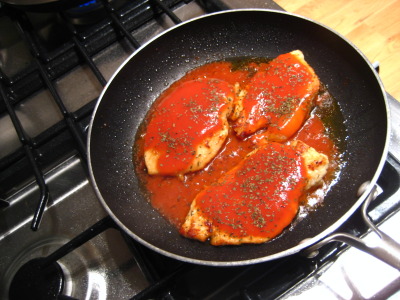
On a plate, combine whole wheat flour and a sprinkling of salt. On a non-wooden cutting board, slice the chicken breasts in half length-wise, as if you were to butterfly them, but cut all the way through. This will make thinner pieces and will cook through faster. Lightly coat the chicken in the flour mixture. In a skillet with the olive oil heated, cook the chicken, about 3 minutes or so on each side.
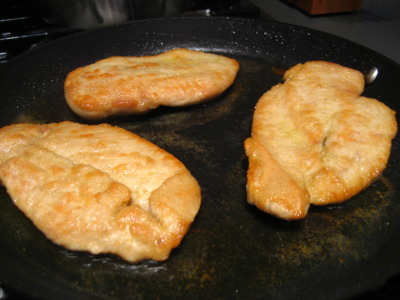
This is where those splatter screens that I threw out before the move would have come in handy as I had oil splattering all over my beautiful new stove. Anyhow, cook the chicken until golden brown and completely cooked through. For me, this entailed cutting each piece multiple times to ensure that the pink had left the building. Anyhow, once they are cooked through, pour a bit of sauce over each one. Sprinkle with basil and parsley.
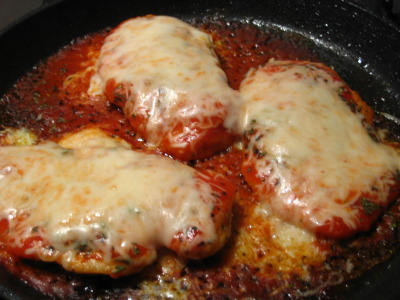
Douse with shredded cheese and cover to melt the cheese, which should only take a minute or so.
Sprinkle with a bit more parsley and grated cheese.
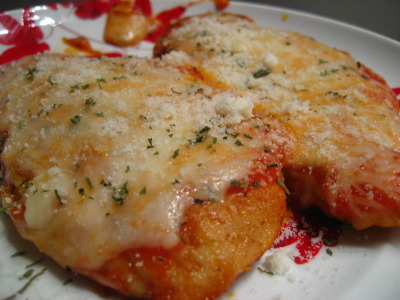
Enjoy! Preferably with a glass of wine! Do you have a go-to dinner for one?
 7 Comments | Share Article | Email Article | tagged Recipes Print Article | Permalink