Hi, I'm Rachel.

A few years ago I could barely boil water.

True story.

Determined to be a kick ass wife, I developed a love for football and learned to cook in my tiny Jersey City kitchen. I spend my days working in Manhattan, my nights and weekends chasing after a rambunctious toddler, and the hours in between cooking with my husband and feeding my TV habit...oh, and I blog about it all! 

Welcome to my world!

Search for Recipes & More!

Subscribe via Email:

Delivered by FeedBurner

Still Hungry?
my foodgawker gallery
Search for Recipes & More!


Subscribe to TAA by Email!

Delivered by FeedBurner


Follow the Food

The Pantry

Entries from August 1, 2010 - August 31, 2010

Tuesday
Aug242010

On the cheap: Iced Coffee

This week, we've finally gotten a bit of a break from the heat. Plagued by 95 degree days for the last few months, Manhattan has been something of a sweat box. In an effort to combat the extreme temps, I've dabbled in a daily iced coffee. After weeks of spending a minimum of $2.50 per day on iced coffee from my local bodega, and sometimes an admitted $3.25 per day at Dunkin’ Donuts, I decided it was time for a change. While it's not a huge expense, I'm all for cutting corners where I can and saving up a bit of cash to put towards more fun things, like a good Sunday brunch. And can we take a moment for the fact that iced coffee should in no way cost more than hot coffee, which can easily be scored for under $2? Not only is it the same product but they are in fact giving you less coffee. There had to be a better way; a way to do it on the cheap.

Enter my new friend and commuting buddy - the COPCO iced coffee cup, a heavy duty reusable plastic cup and straw with a screw-on lid. Can we say genius?

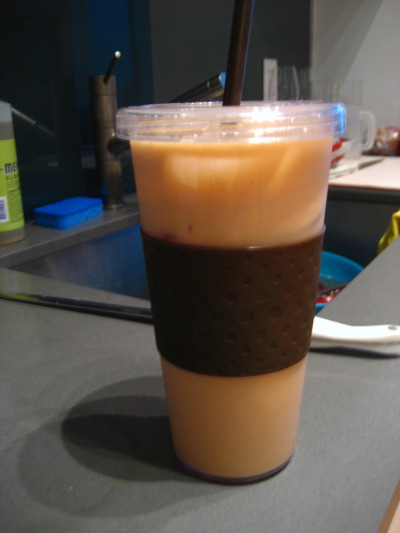
Just when I thought I was the only person living under a rock and had just discovered this wonderful invention midway through the summer, I was pleased to find that I wasn’t the only one who was frustrated and looking for a solution. As I was riding the shuttle to the Path last week, a few co-riders marveled at it, their amateur eyes lighting up with envy. And I have to tell you, I don’t blame them. It is pretty wonderful.

The cup has long since paid for itself while saving me time in the morning, not to mention daily dollars. I simply brew my coffee at night, let it come to room temperature, store it in the fridge overnight and dress it in the morning. And so you know this isn't just hot air, here's the breakdown:

COPCO iced coffee cup: $7.99 (though technically free since my wonderful Mom purchased it for me)
1 bag Dunkin’ Donuts French Vanilla ground coffee: $8.99
Half & Half: $1.29 (though already had, for my weekend coffee)
Total: $18.27 for at least 3 weeks of morning coffee and counting

For $18, this would buy me 7 days at my local bodega (at $2.50/cup) and a mere 5 days of coffee at Dunkin Donuts (at $3.25/cup). Is it me, or does this make so much more sense? And quite honestly, I think the coffee from my own home tastes so much better, not to mention the fact that now I get to enjoy my coffee during my entire ride to work rather than having to wait until crossing into Manhattan. Oh happy day.

So that's how I've managed to save some coin each day while celebrating a personal victory that I'm not being taken advantage of for my $3. So what do you think? Do you BYO or prefer to purchase?

PS - TAA was in no way paid to or offered any compensation or incentive to push the COPCO iced coffee cup. We just happen to think it's tops and want to share!

Sunday
Aug222010

Brunch at Mesa Grill

Last weekend, Shaun and I headed into Manhattan for an extra special Sunday brunch at Mesa Grill. Since Shaun's 2009 birthday dinner made my personal top ten best meals list, and subsequently lead to my early demise at 10PM that night, I had high hopes for this one. The outcome? It was nothing short of Southwestern deliciousness. Let's get down to the goods...

Any good brunch begins with a good bread basket and this one ranks supreme. Filled with coffee cake, moist blueberry scones and mini cheddar-jalapeno biscuits with red pepper jam, the bread basket was the perfect way to kick off our decadent meal and within minutes, I'm semi-ashamed to say, we had polished off most of its contents.

I should point out one of our favorite pieces, a blue corn muffin, made with real kernels of corn - the only way to do corn muffins in my opinion.

Though we easily consumed the entire basket of baked goods, we still deemed it necessary to also have an appetizer before the main attraction. With lots to choose from, we just couldn't pass up the Queso Fundido, a burning hot skillet of cheese and roasted peppers served with blue corn chips. We had sampled this during our last visit, and it was just as good as I've dreamed about ever since.

For my meal, I had poached eggs (something that is oh-so-hard to get right) over sweet potato and shredded chicken hash. It was enough to feed two, yet somehow I managed to put a good dent in it all by my lonesome. Perhaps it's my penchant for dipping or my childhood memories of my parents serving up birds' nests for breakfast, but there's nothing like a good, runny egg yolk.

My faith in Bobby Flay paid off and the poached eggs were perfectly cooked; the whites completely cooked while the yolk was completely runny with no hardened yolk to speak of, causing a veritable puddle of rich egg yolk over my sweet potato hash. Yum.

And though by this point we could scarcely move, I still found it necessary to hear the dessert specials of the day. Once the words pineapple upside down cake were uttered, I was smitten and convinced Shaun that it was in fact necessary to sample the goods. You know, for research purposes.

Encased in a layer of carmelized brown sugar and topped with pineapple ice cream and a slice of fresh pineapple, this dessert was no joke. Even Shaun had to admit that it was a good call. It also was the moment I was completely convinced that I must get myself the ice cream maker attachment for my stand mixer so that I too can come up with out of the ordinary ice cream concoctions.

So there you have it - a delectable roundup of our fancy Sunday brunch. Though I was on the verge of food coma for the rest of the day and it came with a heftier-than-usual price tag, Mesa was the perfect spot for a special Sunday brunch. And what I'd really love to know is, where is your favorite place for brunch?

Psst...for even more brunch fun, check out my roundups of B Bar, Elysian Cafe and Cercle Rouge!

Sunday
Aug152010

Basic Buttermilk Waffles & Maple Syrup

After many, many weekends away, Shaun and I woke up on Saturday with nothing to do and nowhere to go. While I do make a mean scrambled egg, I decided to test my skills on a new recipe for this lazy Saturday.

Enter your basic buttermilk waffles. You'd be very surprised to know how challenging it is to find a simple, straightforward recipe for this classic dish. For the classics, there are few that I would consult. Betty Crocker, my mom, my grandmother's scraps-of-paper-recently-turned-recipe-book, The Joy of Cooking...and in this case, Alton Brown. With his signature obsessive recipe making of the mad scientist variety, it seems as though he knows that he's talking about.

Basic Buttermilk Waffles & Maple Syrup
*Adapted from Alton Brown
1 C all-purpose flour
1 C whole-wheat flour
1/2 tsp baking soda
1 tsp baking powder
1 tsp salt
1 tsp vanilla extract
3 tbsp sugar
3 eggs, beaten
2 oz butter, melted
2 C buttermilk* (and if you don't have any, find out how to make your own, below)
Vegetable spray, for waffle iron
Maple syrup (the real, Vermont kind)

Preheat your waffle iron. In a mixing bowl, whisk together the flours, baking soda, baking powder, salt, and sugar. In a separate bowl, whisk together eggs and melted butter. Add the buttermilk. Add the wet ingredients to the flour mixture and stir until combined, but do not overmix. You'll have a few lumps in your batter. Allow to rest for 5 minutes.

Spray the hot waffle iron with vegetable spray and add the batter. Do not overload the batter, or you'll end up with a giant mess, like I did.

Since my waffle iron makes one lonely waffle at a time, I kept them warm on a sheet pan in a warm oven set to 200 degrees.


*Make your own buttermilk: If you wake up with the urge to make hearty buttermilk waffles, but don't have that one elusive ingredient, try making it yourself. Mix 1 cup of milk with 1 tablespoon of fresh lemon juice. Let sit for about 10 minutes while it curdles and then use in recipe. I doubled mine and put it together in a large measuring cup for easy access.

And while we were at it, we decided to have breakfast on the terrace, the latest place to get a makeover at the Humiston house.

So there you have it. A basic and easy waffle recipe that can easily be jazzed up with some blueberries, strawberries or even some nutella and powdered sugar thrown on top. Since my strawberries that I'd been saving all week turned out to be covered in mold, we went au naturale. So what do you think? Do you do waffles for breakfast? Have you ever made your own? From a mix? Or are you a fan of the Eggo?