

Birthday Cake
 Last week was my sister Kimberly's birthday and we marked the occasion with a soiree at her Brooklyn apartment. Since I'm all about testing my culinary skills, I offered to make the dessert and opened the door to what Kim might think up. Luckily, she's a girl after my own heart and likes things simple (in other words, no Irish Car Bomb cuppy cakes or Mint Julep Brownies, please and thank you). While I'm typically of the chocolate cake-vanilla buttercream persuasion, Kimberly requested a basic yellow cake with chocolate frosting. Sounds easy enough, right?
Since my wonderful mother is something of a domestic goddess (and a super chef to boot) I consulted her for a recipe recommendation. The suggestion? Old-school Betty Crocker as "the only one I would trust," (that's a direct quote). When I saw the recipe for Betty Crocker's New Starlight Cake, I literally said the words, "Could this BE any easier?" And oh how I spoke to soon.
I'm not sure if it was my new oven, the recipe, or some lackluster baking skills, but my first cake turned out like this when I tried to get it out of the pan. 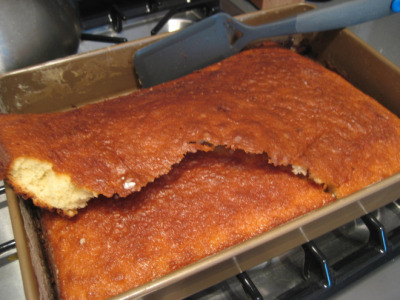 Burnt and broken. Not exactly the moist and fluffy confection that I envisioned. If it wasn't quite so bad, I would have tried the whole glue-the-cake-back-together-with-icing-no-one-will-notice-the-chocolate-river-down-the-middle trick. But alas, the cake was literally in two pieces and I just couldn't bring myself to try and salvage it. So on the morning of the party, I gave it another go. This time, I shortened the baking time considerably, greased that pan like it was nobody's business, and voila...a scrumptious yellow cake worthy of a certain someone's 24th birthday. It was a bit drier that I had hoped, but once slathered with super chocolatey frosting, this cake turned into one that I would definitely make again. Let's get down to the details...
New Starlight Cake
*Adapted from Betty Crocker
2 C all purpose flour
1 1/2 C sugar
3 1/2 tsp baking powder
1 tsp salt
1/2 C vegetable shortening (like Crisco)
1 C milk
1 tsp vanilla extract
3 eggs
Preheat oven to 350 degrees. Butter and flour one 13x9" pan or two round layer pans (Note: You really need to get on this like never before. I had a lot of trouble getting my cake out of my pan and I was using a new non-stick pan loaded with de-sticking ingredients. Just when you think you've buttered and floured enough...do it some more). Measure all ingredients into a mixing bowl (I used my stand mixer, but I will assume that a hand mixer will work just as well). 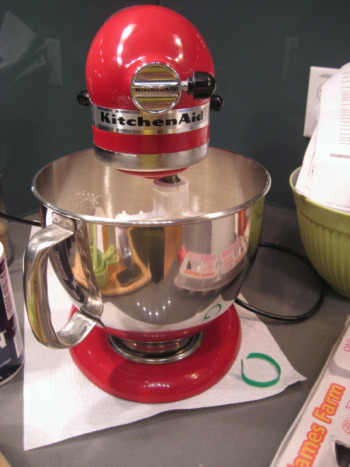 Blend 1/2 minute on low speed, scraping the bowl as it goes. Beat 3 minutes on high speed, still scraping bowl as necessary. Pour the mixture into your pan (or pans).
Now here's the tricky part. The recipe says bake 40-45 minutes for a 13x9" pan, and 30 to 35 for round layer pans. When I baked my 13x9" cake for the first time, I let it go for 40 minutes and ended up with the aforementioned debacle. On the second try, I went with 30 minutes. At this mark, the toothpick came out clean, so I went with it. In my not-so-expert opinion, I'd say regardless of which size cake you make, do a thorough check at 30 minutes (or earlier for the round pans). Just sayin'.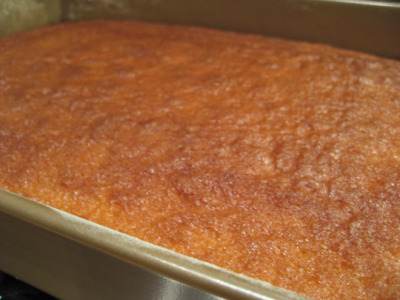 Once finished, cool completely and ice with chocolate frosting.
"Perfectly Chocolate" Chocolate Frosting
*Adapted from Hershey's Unsweetened Cocoa can back
1 stick unsalted butter
2/3 C unsweetened cocoa (obviously I went with Hershey's)
3 C confectioners' sugar
1/3 C milk
1 tsp vanilla extract
Melt the butter. Add to a stand mixer (or a mixing bowl with a hand mixer) and stir in the cocoa. With the mixer on medium speed, alternately add the confectioners' sugar and milk. Beat until smooth, scraping the bottom and sides of the bowl to ensure it mixes evenly. If it's too thick, add a bit more milk. Stir in the vanilla extract.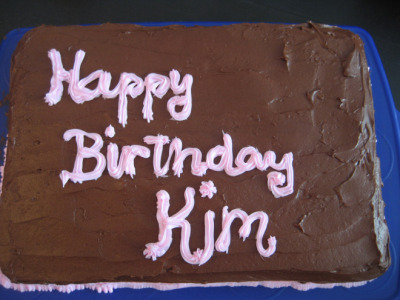
So there you have it. One basic, yet mouthwatering birthday cake. Oh, and you'll notice the Happy Birthday Kim and ribbon trim, courtesy of yours truly and my sister Christine. Not bad for a can of pink frosting with a ribbon tip, huh? Anyhow, what kind of birthday cake is your favorite?
 Post a Comment | Share Article | Email Article | tagged Parties, Recipes Print Article | Permalink