

How to Brine & Roast a Perfect Turkey
Next week is Thanksgiving and that means that turkeys will reign! For Saturday's Sweatsgiving pot luck party, I offered to make the turkey and gravy. Over the last couple of Thanksgivings, I've tried to hone my turkey making skills. Two years ago, I made just a turkey breast for the two of us. Last year, I cooked a seven pounder for Shaun and me and our good friends Lindsey & Eric. This year, we expanded the group to 8...and since I was waiting on the final head count plus wanted leftovers, I went with a giant seventeen pound fresh turkey for the occasion.
To say I was slightly nervous for this undertaking would be a major understatement. Turkey is the staple of Thanksgiving dinner! If I screwed that up, I would have been fairly disappointed in myself and felt terrible for my Sweatsgiving guests. Luckily, with a few easy peasy steps, I ended up with a juicy, delicious, tender turkey that I would make again and again.

Look at that thing!
To make such a juicy turkey (including the white meat!), it all starts with the brine. And with a brine, it all comes down to science. For the second year in a row, I consulted my man and go-to scientist Alton Brown and his turkey brine recipe. And for the second year in a row, we ended up with a perfect turkey. Essentially, brining a turkey is like marinading it; letting it sit in a salty mixture for a long time before roasting it. This traps all those lovely juices inside the turkey, leaving it flavorful...not dry. Once you go brine, you never go back!
To brine your turkey, here's what you'll need:
1 14-17 pound fresh turkey (if you use smaller, reduce brine recipe accordingly)
for the brine (from Good Eats):
1 C kosher salt
1/2 C light brown sugar
16 C (1 gallon) vegetable stock
1 Tbsp black peppercorns
1 1/2 tsp allspice berries
1 gallon very cold water
special equipment:
garbage bags (unscented)
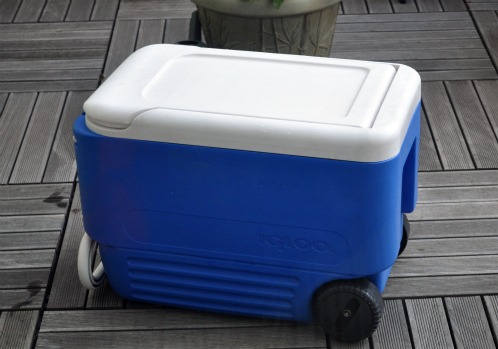
a cooler
ice
Make the brine on the night before you plan to brine the turkey. In a large stockpot, combine the vegetable stock, peppercorns, allspice berries, brown sugar and salt. Mix to dissolve the salt and sugar, and bring to a boil. Once boiling, remove from heat and cool completely. Place in refrigerator overnight.
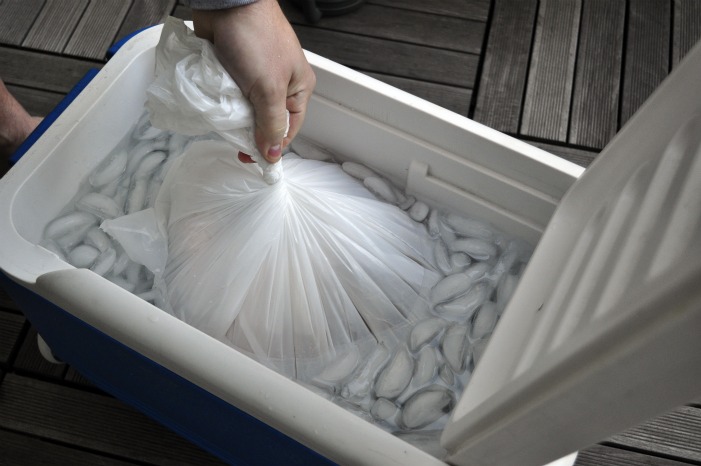
Early on the day of your dinner (with at least 8 hours for brining time), set up the turkey. First, get your cooler going. Fill the cooler about half way with ice and water. By using a cooler, it also frees up your refrigerator!
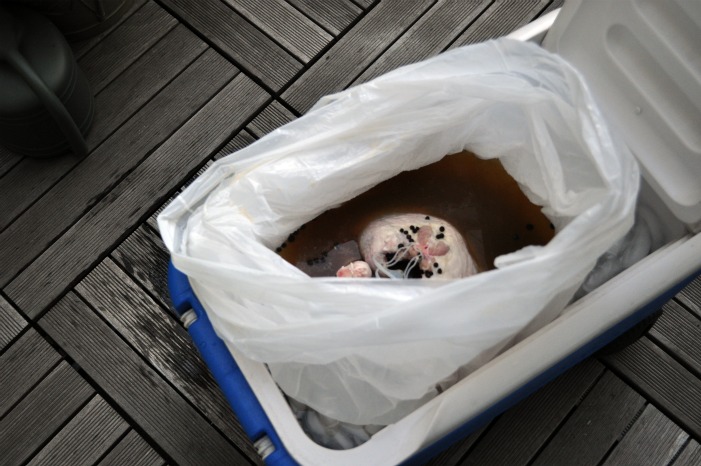
Remove the innards from the turkey and discard or set aside if you plan to use the giblets for your gravy (I did not). Place turkey in a triple bagged garbage bag. Place the turkey in the open garbage bag in the ice bath, but do not let any of the ice water in. Pour in the brine mixture and gallon of cold water.
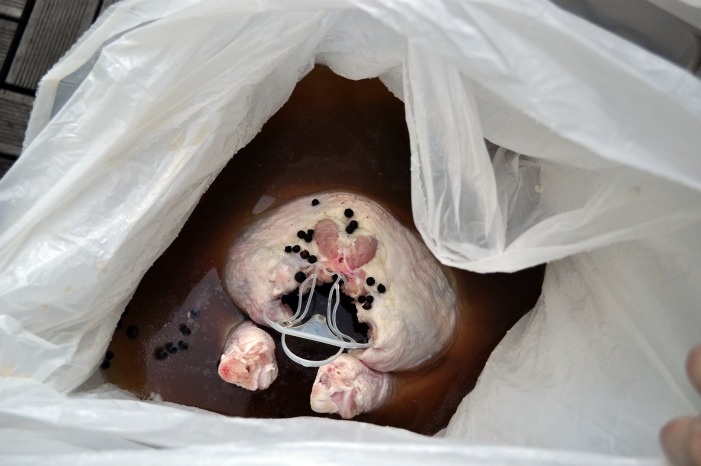
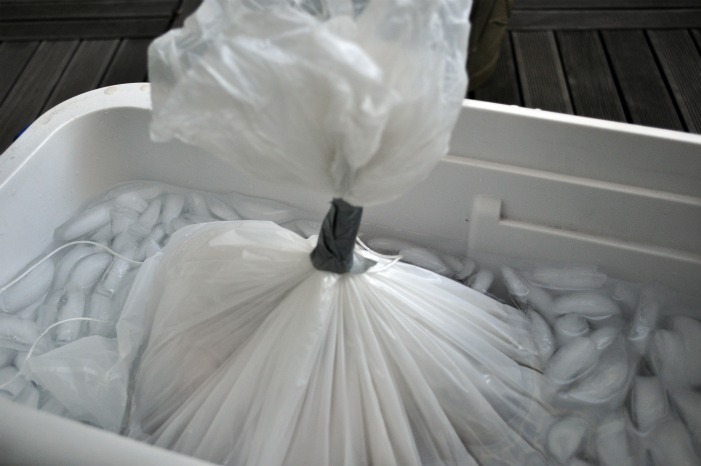
Tie up the top of the garbage bag with twine and duct tape to make sure it is completely secure and doesn't let any of the ice bath water inside. Leave as little air as possible in the bag, making sure that the turkey is almost completely covered with the brine. Close up the cooler and let sit for at least 8 hours. Oh and this process was made infinitely easier by having two sets of hands on duty...Shaun really did most of this set up with just a little help from me!
Once it's time to get your turkey in the oven, it's time to get it out of the brine. Carefully transport the garbage bag to a clean kitchen sink. I recommend transferring the turkey (bag and all) to a small waste basket, recycling bin or even a giant mixing bowl to transport inside. My mother once had a brine bag break all over her kitchen and honestly, I can't think of anything more disgusting to have to clean up. Lesson learned.
Cut open the bag and drain. Rinse the bird with cold water, pat dry and set up on a roasting rack. It's time to roast the bird! Here's what you'll need:
adapted from Good Eats:
1 red apple, sliced
1 onion, sliced
1 cinnamon stick
1 cup water
Fresh herb mix of thyme, rosemary and sage
2 C+ white wine
4 C+ low sodium chicken broth
1 C cut carrots
1 C cut celery
olive oil
kosher salt
freshly ground black pepper
special equipment:
roasting pan (I got one for $10 at Bed Bath & Beyond)
meat thermometer (I got one for $4)
silicon brush or baster
In a small bowl, combine the apple, onion, cinnamon stick and water. Microwave for 3 minutes. Drain the water and place the rest in the turkey cavity, along with the fresh herbs. Spread a bit of olive oil all over the turkey skin and sprinkle with salt and pepper. In the bottom of the roasting pan, add carrots, celery and white wine (enough to just cover the bottom of the pan).

Roast the turkey on the bottom oven shelf at 500 degrees for 30 minutes. Check after 15 minutes and add a bit of chicken stock to the roasting pan if it starts to dry up - I added about a cup at a time. Brush or baste the turkey skin with the stock in the bottom of the pan.
After 30 minutes, insert the meat thermometer into the turkey breast, reduce the oven to 350 degrees and roast for 2 - 2.5 hours, checking frequently (every 15 minutes) to add more liquid to the bottom of the pan if it gets dry and to brush or baste the bird with the pan juices.
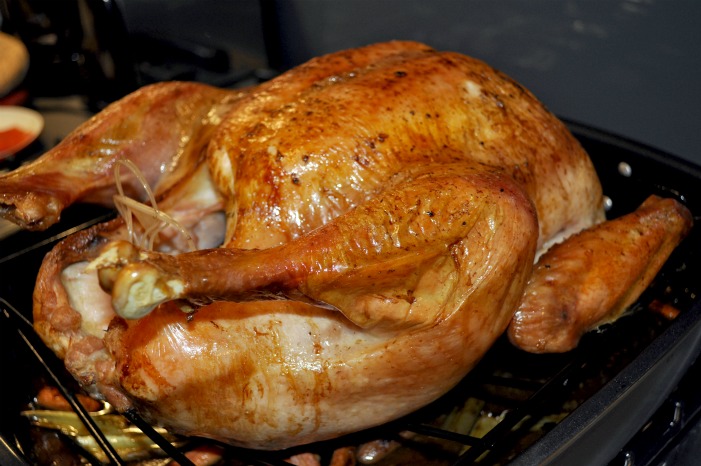
Once the thermometer reads 165 degrees, the turkey is done. Remove from oven, cover with foil and let rest for 15 minutes before carving.
Smile! Pat yourself on the back. Do a happy dance...
You just made a golden brown, yummy, perfect turkey that all of your guests will love!
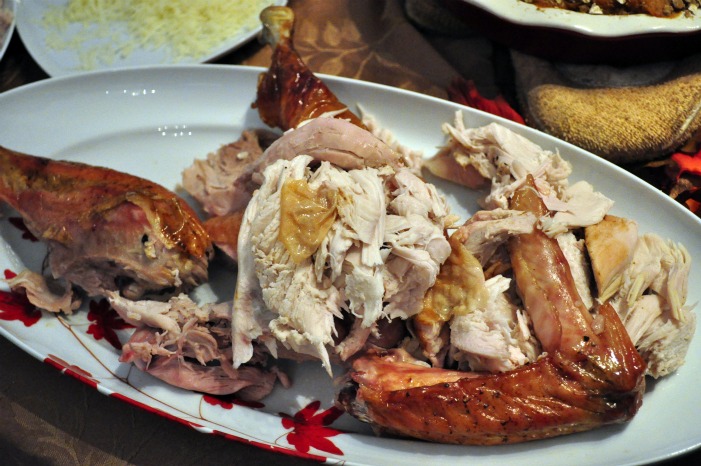
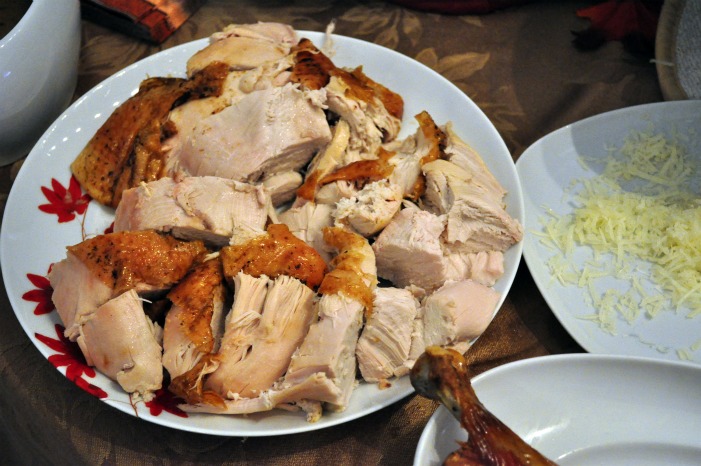
Carve it up and enjoy! We had golden brown, crispy skin and juicy white and dark meat. Mmmm.
It seems like a lot of steps, but I promise, it's super easy! You really can't mess it up. And then, I beg you...make gravy from the pan juices!
It's so easy and really makes the entire meal!
Notes:
Please, please please use a meat thermometer! You don't need anything fancy. A $4 version will do the trick.
I made my stuffing separately from the turkey. This greatly reduced the roasting time of the turkey. Plus, I see no need to put bread in the turkey's hoo-hah when it turns out completely delicious by simply cooking separately in the oven instead.
Baste & brush! This will help keep the turkey juicy!
Brine! Please don't ever make a turkey without brining. Brining rules! Once you go brine, you simply won't be going back.
Leave extra roasting time! Just in case anything goes wrong, you don't want your guests waiting too long for dinner. I left myself about 3.5 hours. Though it was done in about 2 hours, I simply turned off the oven and let the turkey sit inside to keep warm until we were ready to get set up for dinner. Then, let it rest and carve.
So there it is. Everything I know about making a turkey. Let me know if you try it this Thanksgiving!
Questions of the Day:
Have you ever made or brined a turkey?
Will you be making the turkey for Thanksgiving this year?
 10 Comments | Share Article | Email Article | tagged Holiday Print Article | Permalink
Reader Comments (10)
that's one good lookin turkey! never thought to use a cooler before, we always used the sink.
This looks so delicious! I am so sorry I missed this food. I also never knew that happened to Mom - so gross! haha
Well well well- your turkey post is absolutely amazing- the steps and techinque and then the end result. Girl, that turkey is mighty fine and I am wishing you would just come cook mine for me this year:)
I've never brined a turkey because I thought it would never fit in my fridge. Well, DUH! Use a cooler! Why didn't I think of that?
That turkey looks EXCELLENT! I have tried to make a turkey once in college - without knowing any better. Now, I realize how important brining is. Bring on the salt water!
Stumbled across your blog via Twitter friends..thanks for this post - I've been searching for ways to brine my turkey all day cause I wasn't sure if my parent's house had a bucket large enough so I started to get nervous. I will definitely be seeing if they have a cooler like that. I also wasn't sure about the trash bag (like if it would leak or not) but looks like yours worked out great. Thank you! :)
Julie, so happy you found us! Make sure you use a few layers of garbage bag. We used 3! That way even if one (or 2!) break, you still have extra layering! Let me know how it turns out :)
last year I was in charge of cutting the turkey because I was the only one who wouldn't steal "scraps" - the vegetarian jokes persisted all night long! You turkey looks delicious and totally edible! I'm trying to find a good gluten-free non-meat alternative still, but I think I might just fill up on stuffing!
That looks amazing. Well done! It looks like it was worth all the effort. I didn't know that there was such a science behind basting a turkey!
I'm a big fan of cooking stuffing in its own dish too ;) Your turkey looks fantastic! You definitely rocked it.