Hi, I'm Rachel.

A few years ago I could barely boil water.

True story.

Determined to be a kick ass wife, I developed a love for football and learned to cook in my tiny Jersey City kitchen. I spend my days working in Manhattan, my nights and weekends chasing after a rambunctious toddler, and the hours in between cooking with my husband and feeding my TV habit...oh, and I blog about it all! 

Welcome to my world!

Search for Recipes & More!

Subscribe via Email:

Delivered by FeedBurner

Still Hungry?
my foodgawker gallery
Search for Recipes & More!


Subscribe to TAA by Email!

Delivered by FeedBurner


Follow the Food

The Pantry

Entries in Recipes (92)

Friday
Dec182009

Bark Up This Holiday Tree: Chocolate Bark Three Ways

As promised, we're ending the week with a little tutorial on making the easiest holiday snack of all time. It's chocolate bark, and today I'm serving it up 3 ways to satisfy almost any taste bud. Let's get down to the goods, shall we?

Hold up. Before we go any further, how about a quick lesson in chocolate melting? I refuse to give in to the double boiler, so I go with the good old-fashioned microwave instead. I've done this many, many times and burned many, many bowls of chocolate, so I think it's only right to give you, dear reader, a quick rundown.

Here's how I get it done:
Place chopped chocolate in a shallow bowl (yup, if you aren't using chocolate chips, you really need to give it a rough chop for the chocolate to melt evenly - if you are in fact using chips, carry on as is). Microwave chopped chocolate at 15 second intervals (trust me! I have burned a LOT of chocolate in my day - don't be tempted to add additional time, even when after the first couple of intervals it will seems as, though nothing is happening...do not give in. It must be at 15 second intervals), stirring in between each time, even when it seems like nothing is happening. It will.
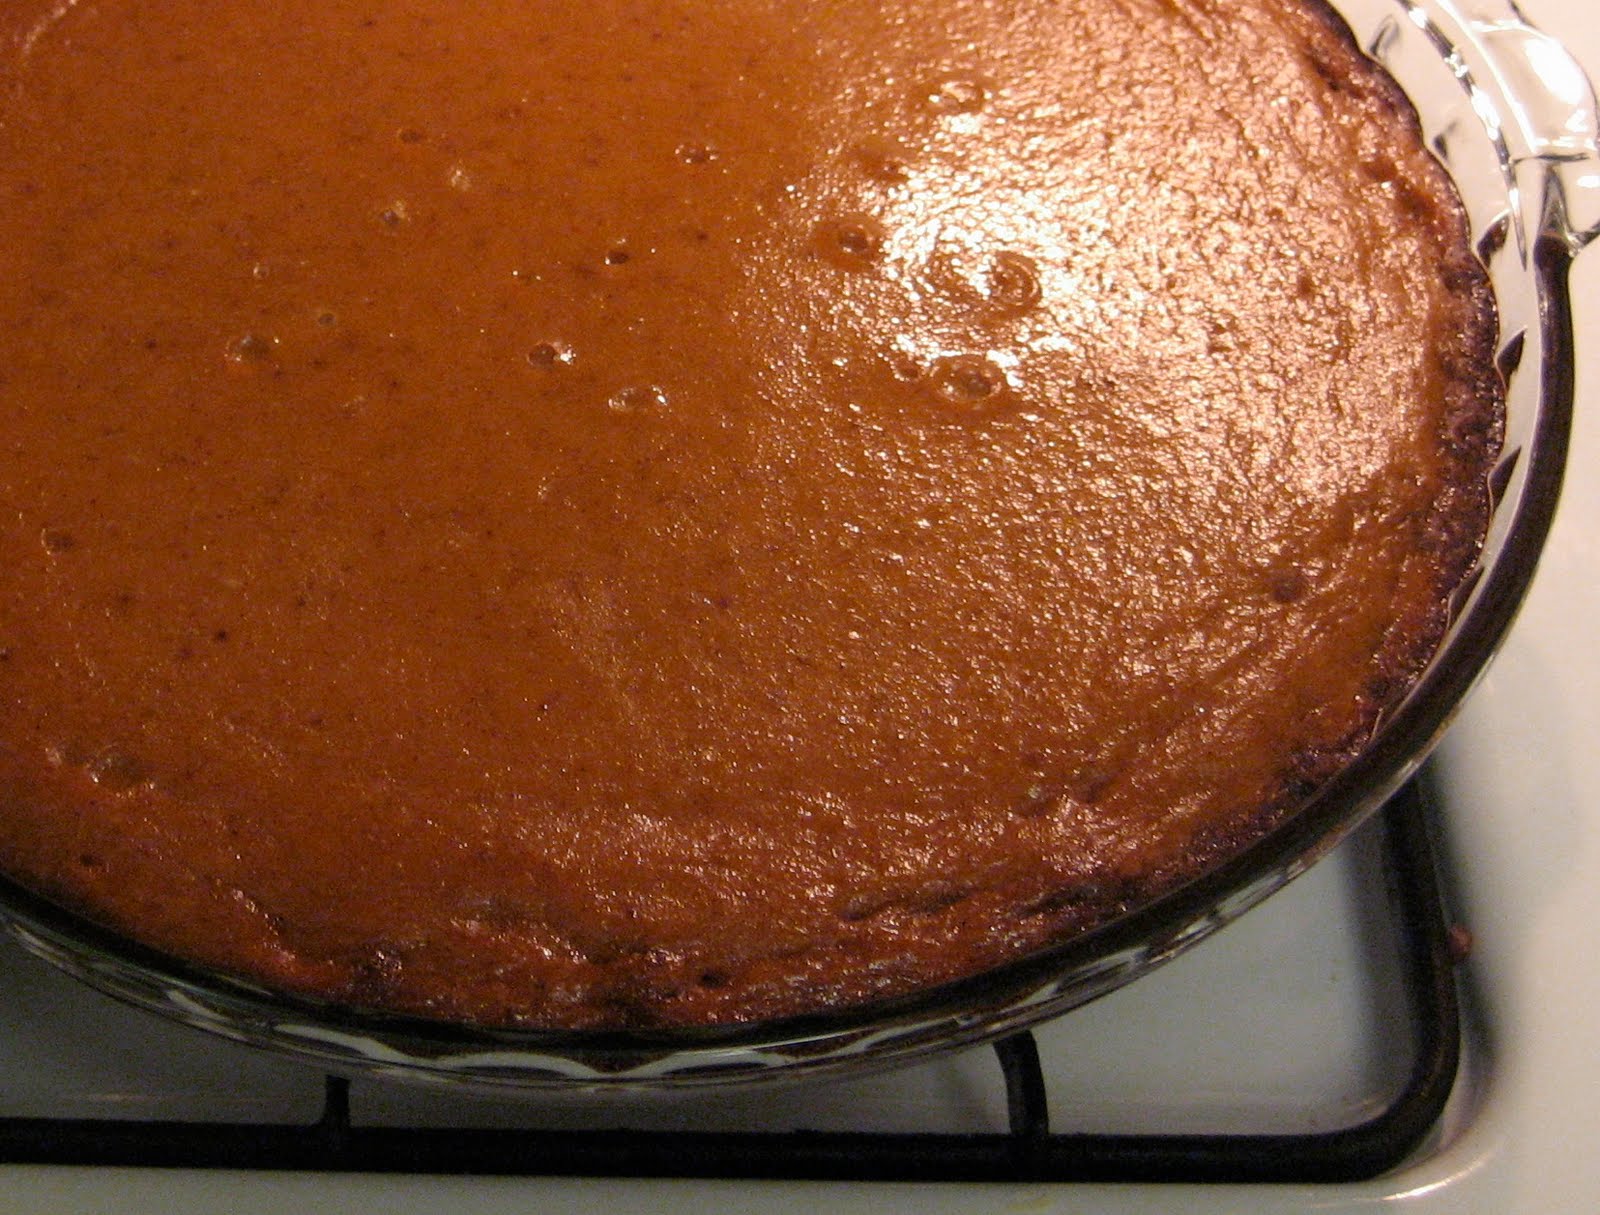
When the chocolate seems like it's just about done, but still has a few lumps, remove from the microwave and stir quickly. This will melt the remainder of chocolate chunks without microwaving, and therefore burning, the already fully melted part. It should look something like this:

That's it. Now enjoy perfectly melted, photo op quality chocolate.

Cranberry Orange White Chocolate Bark
4-5 oz white chocolate, roughly chopped (I use Baker's Chocolate, found in any grocery store baking aisle and premeasured into 1 oz squares)
1/3C Dried cranberries
1 tsp Orange zest
After melting your white chocolate, stir in dried cranberries and orange zest. Step lightly, as the chocolate will cool off and harden very, very quickly. Immediately spread out in a thin layer on a sheet pan - I lined mine with parchment paper for easy removal and clean-up. It may require a bit of elbow grease to spread it out, but use a spatula, get your hands dirty, and get 'er done. Let sit for a few minutes and then press aluminum foil down on the bark to hold it in place.

The next morning, with foil still on, bang all over with rolling pin. Remove foil, and break up pieces with your hands.

The result: A creamsicle tasting piece of goodness. The dried cranberries cut out some of the super white chocolate sweetness, leaving a perfect flavor combination that I will be devouring as soon as the clock strikes noon.

Chocolate Cherry Almond Bark
6 oz semisweet, white, or milk chocolate
1/3 C Dried cherries, chopped
1/3 C Slivered almonds, toasted in small pan for about 2 min - don't let them burn!!
After melting your semisweet chocolate, stir in cherries and almonds. Repeat steps above.

And after a night of cooling and being bammed with a rolling pin...


The result: I'm a huge fan of dried cherries so I had high hopes for this one. It did disappoint, however. I went with the semisweet chocolate and I think it was just too bitter to counterbalance the sour cherries. Next time, I'm going milk or white chocolate and I think it will be the winning combo I'm looking for.

Traditional Peppermint Bark
6 oz Semi-sweet chocolate
1 C White chocolate chips
4 Candy canes, crushed
1/2 tsp Peppermint extract
Melt semisweet chocolate and stir in peppermint extract. Spread out on sheet pan and let sit until semi-hardened. Next, temper white chocolate (I used chips here because I ran out of Baker's Chocolate) and carefully spread out on top of the semisweet chocolate. Mine ended up running together a bit, but it doesn't have to be perfect. Sprinkle crushed candy canes on top and press down with aluminum foil.

When it's all put together...

Keep aluminum foil on top of bark, as above, and the next morning you'll get...

The result: What can I say? Nothing beats a classic. This was my favorite of the bunch. Crunchy candy cane on mint chocolate is a dynamite combination in my book. And this version give Williams-Sonoma a serious run for their money.

Now, before you break it all up and reap the sweet rewards, you need to let these cool completely. Even when you think it's done, it's probably not. I'm hesitant to put in the refrigerator since it tends to turn the chocolate into crumbly gray. Instead, I recommend finding a very cool area, like the garage or in a particularly cold room in your home. I laid the pans out in my living room, which gets pretty darn cold in the evening hours. The next morning, with the bark still covered with foil, bang 'em with a rolling pin for an imperfect break. Enjoy!

So what do you think? Do any of these sweet confections make your sweet tooth tingle? Do you have any other holiday barks that you love this time of year?

*Note: I made these in very small batches since I was making all three in one night (all I can say is thank god I'm not a big chocolate eater or I'd be about 400 pounds). If you want more, adjust recipes accordingly.

Thursday
Nov192009

Talk Turkey To Me


We're one week away from arguably the biggest food holiday of the year. I know I've inundated you with posts of pumpkin love (this one too), but today I want to talk turkey. And not just turkey, but the whole enchilada when it comes to Turkey Day fare.  If you're hosting the big day, hopefully you've already planned your menu or at the very least ordered your bird. Though I'm not hosting Thanksgiving on the day itself, I am planning a little soiree for two on Sunday afternoon.You may have heard about my new found love for the pigskin, and this Sunday is one of the first this season that Shaun and I will get to view from our very own comfy couch. (You see those darn Jets season tickets have been a blessing and a curse...while providing weeks of enjoyment 7 rows from the end zone, we've hardly had a football day to cozy up with a festive foodie spread for 7+ hours in front of the tube). This way I get to test out my culinary skills, report to all of you, and stuff my proverbial piehole with lots and lots of turkey and fabulous side dishes. I think the Sunday before Thanksgiving is just the ticket for a pre-Turkey Day fete.

Like I mentioned, I don't host my own affair on Turkey Day, but Shaun and I started this tradition last year as a fun Sunday dinner before Thanksgiving. We'll call last year's a Semi-Homemade Thanksgiving - while I made the sweet potatoes and cranberry sauce, the stuffing was from a mix (blech!) and the turkey portion consisted of little turkey cutlets with gravy from a packet. Well ladies and gentlemen, with a year of cooking under my belt, I'm bringing back a few favorites (sweet potatoes!) and upping the ante with a real turkey breast and homemade stuffing. Here's the menu:
 

The Humiston's Pre-Turkey Day Menu
Roasted Turkey Breast
Pan Gravy
Stuffing
Mashed Potatoes
Sweet Potato & Banana Casserole
Cranberry Sauce
Brussels Sprouts
Dessert (tbd)

Let's start from the top, shall we? Here's the breakdown:

The Main Event: Roasted Turkey Breast
Ok so last year I did the prepackaged turkey cutlet thing, rolled them with boxed stuffing, stuck 'em with a toothpick, baked 'em and called it a day. And I'm not gonna lie to you...it wasn't bad. In fact, with some gravy it was pretty darn tasty. But this year, I think I'm ready for a turkey, albeit a tiny one consisting of only the breast. I'm planning to snap up this little roasting pan or something like it (at only $17.99 minus a 20% off coupon!) along with a basic probe thermometer like this one. For a recipe, I'm going simple and basic with Ina Garten's Herb-Roasted Turkey Breast. Super simple for a turkey first-timer like me, but by no means lacking in flavor. It even contains one of my new favorite cooking ingredients, white wine. I can just smell the crispy roasted skin...

Turkey's Favorite Dipping Sauce: Gravy
Add some veggies and chicken stock to the roasting pan before cooking the turkey. Once it's finished, remove veggies, add a bit o'flour and more stock. Whisk to incorporate and thicken and you'll have a savory gravy and turkey's favorite companion.

Turkey's Closest Friend: Stuffing
None of that cornbread boxed stuff for the Humistons this year. Instead, one of my besties and fellow domestic diva Catherine has given rave reviews to and highly recommended Paula Deen's Good Old Country Stuffing. Though apparently it serves 30 people and we're just 2, I'm going for it anyway.

The Sides: Mashed Potatoes
This is where Shaun comes in. He makes fabulous mashed potatoes and I'm leaving it at that.


More Sides: Sweet Potato & Banana Casserole
I don't even really have words for this one. Last year, I took Tyler Florence's Whipped Sweet Potatoes and Bananas with Honey for a test drive, and it had me at first bite. So delicious, in fact, that I made it again for Thanksgiving day itself. Creamy sweet potatoes and bananas topped with a brown sugar crumble...it doesn't really get yummier than that. Though the banana to sweet potato ratio was a bit high for me (I'm looking for a little less banana, a little more yam) it's nothing that can't be fixed with a quick switcheroo.

Add a Little Bite: Cranberry Sauce
I'm going basic on this one. Fresh cranberries cooked with brown sugar and a cinnamon stick is all I need to get this guy done.

And Something Green I Suppose: Brussels Sprouts
I think this one will be my biggest challenge. Making the Little Shop of Horrors-esque veggies taste delicious will be a serious challenge, but nothing that a little cheese or bacon (or both) can't cure.

The Icing on the Cake: Dessert
I have to say, I'm a little at a loss for this one. I'm feeling overwhelmed by the possibilities, yet not wanting to go completely overboard since I'm pretty sure the hefty meal listed above will leave us stuffed to the brims. While I could obviously always do a pumpkin dish, I'm not sure it's fair to subject Shaun to yet another overload of pumpkin. So I'm looking to you, dear and fabulous readers, for some suggestions on a good dessert for two. Please help!

So what's going to be on your table this year? Sure, I'm taking on a lot for a simple fete for two, but really, what could possibly be cut out of my basic, yet chic, Thanksgiving dinner? What's on your menu this year? What are you bringing to friends and family? I'm always looking for new ideas (especially on that dessert for 2!) so leave some comment love!

Tuesday
Nov102009

Taste of Fall: Ginger Snap Crusted Pumpkin Pie


Though I may have alluded to my pumpkin obsession, I'm not sure that I've really expressed the seriousness of the situation. I love pumpkin. There I said it. I LOVE PUMPKIN! It is really one of my favorite flavors and ingredients. Since it only makes an appearance for a short time during the year, I try to soak up as much pumpkin as possible. This past weekend I whipped up one of my favorite, down home desserts - a traditional pumpkin pie.

If you love pumpkin and/or are looking for a great Thanksgiving dessert, give this one a whirl! Just one thing I need to mention. I beg you - if you do one thing with this recipe, please please please make your own crust. It seriously is the easiest part and you cannot believe the difference. Take it from my own personal experience: The first time I made this pumpkin pie, I used a pre-made crust. While the pumpkin part was obviously delicious and wonderful, the crust...not so much. And in my personal opinion, the crust is just as important as the pie. And since this super simple crust is easy as pie, there are no excuses. Homemade crust is a must! Ok, I'm now off my soapbox. Let's get down to the recipe.


Delicious pumpkin pie, made possible by some standard fall ingredients! 
Crust:
For the crust, I changed up the traditional graham cracker for ginger snaps. While I still think graham cracker crusts are fabulous, I wanted to try something new for this recipe. If you're not into ginger snaps, substitute 24 graham crackers for the 24 ginger snaps.
24 Ginger Snap cookies
1/2 stick butter, melted

Pie:
The pie filling is adapted from the classic LIBBY'S recipe. You can view the original ingredients below and note my changes in parentheses. 
3/4 cup granulated sugar
1 teaspoon ground cinnamon
1/2 teaspoon salt
1/2 teaspoon ground ginger
1/4 teaspoon ground cloves (I used 1/8 tsp cloves and 1/8 tsp nutmeg)
2 large eggs
1 can (15 oz.) LIBBY'S® 100% Pure Pumpkin (Make sure you use pure pumpkin, not pumpkin pie filling!)
1 can (12 fl. oz.) Evaporated Milk (I took this opportunity to cut a little fat and used Fat Free Evap Milk)
1 unbaked 9-inch (4-cup volume) deep-dish pie shell (Noooooo! See above rant and subsequent crust recipe)
Whipped cream, optional (If you know me at all, you know that this is in no way optional)

Put it all together:
- Preheat oven to 350 degrees.

- Place ginger snaps in food processor and process until coarse crumbs - but don't over-blend!

- In microwave, melt butter. Then, add melted butter to processed ginger snaps in food processor. Pulse a few times until butter is combined.


- Press ginger snap crumbs into 9-inch pie plate. You may need to roll up your sleeves on this one and get your hands dirty - make sure crust is evenly pressed into plate.

- Bake crust for 8 - 10 minutes and then let cool.

- Change oven temperature to 425 degrees.

- In mixing bowl, mix sugar, cinnamon, salt, ginger, nutmeg and cloves in small bowl.


- Beat eggs in large bowl. Stir in pumpkin and sugar-spice mixture. Gradually stir in evaporated milk.

- Pour into pre-baked, homemade pie shell - for the love of food, not the prebought kind!!


- Bake in preheated 425° F oven for 15 minutes.

- Reduce temperature to 350° F; bake for 40 to 50 minutes or until knife inserted near center comes out clean. Cool on wire rack for 2 hours.


- Top with (lots o') whipped cream and ENJOY!

- Tip: This pie tastes best the day after. Let cool completely, cover with plastic wrap and foil, refrigerate, and eat the next day. The flavors are stronger (in a good way) and the crust is softer.

Looks tasty, doesn't it? So what do you think? Any other fabulous pumpkin recipes out there? If so, don't hold out on me! I only have a limited time to get my fill!